Summary
GibbsCAM 2026 expands Multi-Axis Surface Finishing for Wall, Floor, and Rest Finishing. New controls support advanced barrel tools, toolpath extensions, and a Parallel to floor wall pattern.
Table of Contents
What Changed in GibbsCAM 2026
Important: Inspect tool contact, extensions, tilting, and holder clearance before approving the operation.
Before You Begin
• Use GibbsCAM 2026 with supported Multi-Axis Surface Finishing.
• Define accurate drive surfaces, planar floor geometry, tool, holder, stock, and fixtures.
• Duplicate the existing operation and retain its simulation as a baseline.
Procedure
Step 1 - Choose the Finishing Mode
1. Open the Multi-Axis Surface Finishing operation.
2. Choose Wall Finishing, Floor Finishing, or Rest Finishing for the required surface.
3. Define the complete advanced barrel tool and holder when that tool type is used.
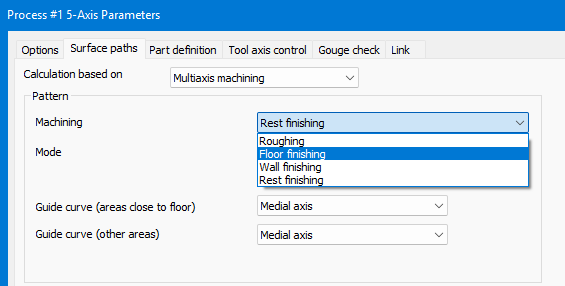
Figure 1 Select the supported finishing mode
Source: What's New in GibbsCAM 2026, p. 40
Step 2 - Extend Closed Contours
1. Under Area, open Extend toolpaths.
2. Enter a conservative extension when start and end cusps must be reduced.
3. Regenerate and inspect the extension at every closed contour.
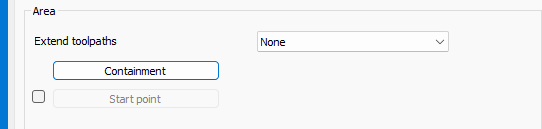
Figure 2 Extend closed contours only as far as the local geometry allows
Source: What's New in GibbsCAM 2026, p. 40
Step 3 - Use Parallel to Floor
1. For Wall Finishing with a planar floor, select Parallel to floor surface.
2. Regenerate and inspect slice continuity, tilting, stepover, and surface quality.
3. Use another validated pattern when the floor or wall geometry is unsuitable.
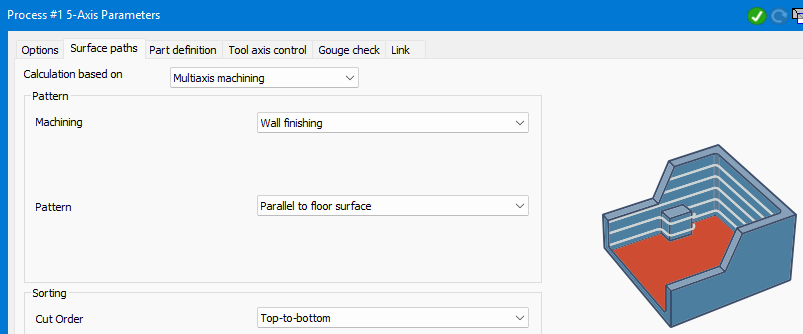
Figure 3 Generate wall slices parallel to a planar floor
Source: What's New in GibbsCAM 2026, p. 41
Step 4 - Validate the Operation
1. Compare surface quality and cycle time with the baseline.
2. Run Op Simulation and Machine Simulation with the complete setup.
3. Post with the approved postprocessor and complete controlled prove-out.
Expected Result
• The selected pattern produces controlled surface contact.
• Extensions reduce start and end cusps without unsafe motion.
• The complete tool assembly remains clear in simulation.
Best Practices
• Define barrel-tool geometry completely.
• Adjust one finishing control at a time.
• Keep extensions as short as practical.
• Retain the baseline until the new result is approved.
Troubleshooting
• Problem: The finished surface has cusps or an uneven pattern.
Cause
• The extension, pattern, tolerance, or stepover is unsuitable.
• Tool or surface geometry is inaccurate.
Resolution
Correct the geometry, adjust one setting conservatively, and recalculate before comparing the result.
• Problem: Parallel to floor is unavailable or produces an unexpected path.
Cause
• The operation is not supported Wall Finishing.
• The selected floor is not planar or the wall/floor set is unsuitable.
Resolution
Confirm the supported strategy and planar floor, then use another validated pattern when needed.
• Problem: The tool or holder collides during an extension.
Cause
• The extension is too large.
• The tool assembly or nearby fixture is incomplete.
Resolution
Stop release, correct the setup, reduce or disable the extension, and rerun complete simulation.
Related Articles
• Recommended Simulation Settings
Explore More from CAMCO
Visit the CAMCO website to learn more about:
• Downloads and Helpful Resources
Keywords
GibbsCAM 2026, Multi-Axis Surface Finishing, advanced barrel tool, Wall Finishing, Floor Finishing, Rest Finishing, Extend Toolpaths, Parallel to floor
Was this article helpful?
That’s Great!
Thank you for your feedback
Sorry! We couldn't be helpful
Thank you for your feedback
Feedback sent
We appreciate your effort and will try to fix the article