Summary
GibbsCAM 2025 can include Intermediate Tooling and workspace fixtures in supported collision-avoidance calculations. Many processes use Avoid IT Fixtures on the Solids tab; Advanced 3D provides the control and Fixture Clearance on the Boundary tab.
Table of Contents
- What Changed in GibbsCAM 2025
- Before You Begin
- Procedure
- Related Video
- Best Practices
- Troubleshooting
- Related Articles
What Changed in GibbsCAM 2025
Important: Fixture-aware calculation reduces collision risk but does not replace complete simulation, posted-code review, machine-limit checks, or controlled prove-out.
Before You Begin
• Use GibbsCAM 2025 with the applicable process product and license.
• Confirm that Intermediate Tooling and workspace fixtures represent the actual setup and are positioned correctly.
• Use the CAMCO-approved MDD and verify any defined Clearance Volume.
• Save a baseline part and toolpath before changing avoidance or clearance settings.
Procedure
Step 1 - Verify the Fixture Setup
1. Display Intermediate Tooling and workspace fixtures and compare them with the setup plan.
2. Confirm fixture offsets, orientation, clamp position, and machine attachment relationships.
3. Correct incomplete or misplaced fixture geometry before calculating toolpaths.
Step 2 - Enable Fixture Avoidance
1. Open the applicable process dialog.
2. For supported processes, select Avoid IT Fixtures on the Solids tab.
3. For Advanced 3D, use the Boundary tab and set Fixture Clearance only when required by the approved setup.
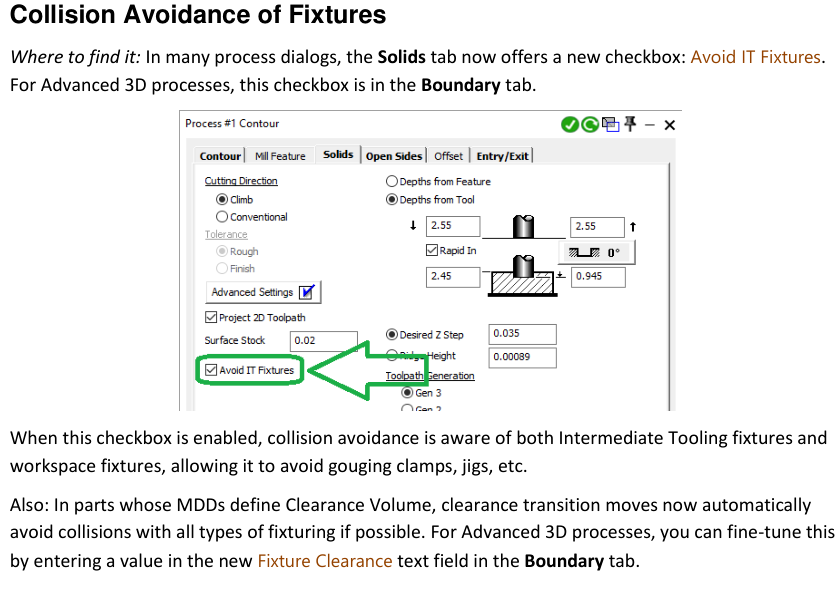
Figure 1 Include correctly classified fixtures and verify the complete regenerated path
Source: What's New in GibbsCAM 2025, p. 26
Step 3 - Recalculate and Inspect the Toolpath
1. Recalculate the operation and review motion near every fixture and clamp.
2. Check whether retracts and transitions follow the approved Clearance Volume when the MDD defines one.
3. Compare the result with the saved baseline and investigate unexpected path or cycle-time changes.
Step 4 - Simulate and Validate Output
1. Run complete simulation with the tool, holder, stock, fixtures, Intermediate Tooling, and machine components displayed as applicable.
2. Post the program and review all approach, retract, transition, and indexing moves near the fixturing.
3. Complete the shop's controlled prove-out before releasing the process.
Expected Result
• The supported process includes Intermediate Tooling and workspace fixtures in its avoidance calculation.
• Clearance transitions use the approved MDD Clearance Volume when applicable.
• Simulation and posted-code review show adequate clearance around all defined fixtures.
Related Video
Best Practices
• Model every clamp, jaw, fixture plate, and attachment that can enter the motion envelope.
• Treat fixture placement and offsets as controlled setup data.
• Use the smallest approved Fixture Clearance that provides the required safety margin without excessive motion.
• Recalculate and simulate after any fixture, MDD, tool, holder, or process change.
Troubleshooting
• Problem: Avoid IT Fixtures is missing.
Cause
• The active process exposes the control on a different tab, such as the Advanced 3D Boundary tab.
• The process, product, license, or installed build does not support the option.
Resolution
Check the process type and the Solids or Boundary tab, then confirm GibbsCAM 2025 product and license support. Use a supported process or contact CAMCO if the control remains unavailable.
• Problem: The toolpath still passes through a fixture.
Cause
• The fixture is not defined as Intermediate Tooling or a workspace fixture.
• The fixture geometry, placement, offset, or process selection is incomplete.
Resolution
Stop release. Correct the fixture definition and placement, confirm the option is enabled, recalculate, and repeat complete simulation.
• Problem: Fixture avoidance creates excessive motion.
Cause
• Fixture Clearance is larger than required.
• The fixture or Clearance Volume is oversized, misplaced, or more complex than the setup requires.
Resolution
Verify the setup geometry and approved clearance, adjust only the incorrect source value, then recalculate and compare the complete motion with the baseline.
• Problem: A clearance transition still risks a collision.
Cause
• The active MDD lacks the required Clearance Volume or it does not match the machine configuration.
• The move cannot avoid the defined fixturing within the available travel or process constraints.
Resolution
Stop release. Confirm the approved MDD, Clearance Volume, machine travel, and fixture placement with the machine-definition owner. Revise the setup or process and repeat validation.
Related Articles
• How to Create a Pack and Go File
Explore More from CAMCO
Visit the CAMCO website to learn more about:
• Downloads and Helpful Resources
Keywords
GibbsCAM 2025, Avoid IT Fixtures, fixture collision avoidance, Intermediate Tooling, workspace fixture, Advanced 3D, Boundary tab, Fixture Clearance, Clearance Volume, MDD, simulation
Was this article helpful?
That’s Great!
Thank you for your feedback
Sorry! We couldn't be helpful
Thank you for your feedback
Feedback sent
We appreciate your effort and will try to fix the article