Summary
In GibbsCAM 2024, ALT displays virtual points on supported geometry, solids, and visible cubic stock. ALT+Click enters one coordinate value, and ALT+SHIFT+Click can enter values in multiple fields.
Table of Contents
- What Changed in GibbsCAM 2024
- Before You Begin
- Procedure
- Related Video
- Best Practices
- Troubleshooting
- Related Articles
What Changed in GibbsCAM 2024
Important: Verify the active coordinate system, virtual point, and destination fields before applying the command.
Before You Begin
• Use GibbsCAM 2024 or later and show the required geometry or model data.
• Enable Edge Selection for virtual points on supported solid edges.
• Show cubic stock when its corner or edge points are required.
• Open the destination dialog before entering coordinates.
Procedure
Step 1 - Display a Virtual Point
1. Zoom in on the required geometry.
2. Hold ALT and hover near a supported point, such as a line midpoint, arc center, solid-edge vertex, or visible cubic-stock point.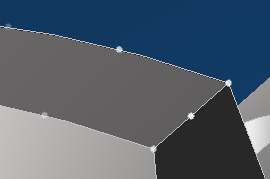
3. Confirm that the displayed point is the intended reference.
Step 2 - Enter Coordinates
1. Activate the destination field in the open dialog.
2. Use ALT+Click to place a coordinate in one field, or ALT+SHIFT+Click to place coordinates in multiple fields.
3. Verify every populated value and the active coordinate system.
Step 3 - Use a Point for Dimensions
1. Open the Dimension palette.
2. Hold ALT to display the required virtual point.
3. Use it to preview and create the dimension, then verify the result.
Expected Result
• ALT displays the intended temporary reference point.
• The selected coordinate values populate the correct fields.
• Dimensions reference the intended virtual points.
Related Video
Best Practices
• Zoom in before selecting a point in a crowded area.
• Use a saved model reference when repeating critical coordinate entry.
• Verify values before moving, rotating, or creating geometry.
Troubleshooting
• Problem: ALT does not show the expected point.
Cause
• The pointer is not close enough to supported geometry.
• Edge Selection is off, or cubic stock is hidden.
Resolution
Zoom in, show the required data, enable Edge Selection when needed, and hold ALT over the target.
• Problem: The wrong coordinate or fields are populated.
Cause
• The wrong point, coordinate system, or field was active.
• The single-field and multiple-field shortcuts were confused.
Resolution
Clear the values, confirm the active fields and coordinate system, then repeat with ALT+Click or ALT+SHIFT+Click as appropriate.
Related Articles
Explore More from CAMCO
Visit the CAMCO website to learn more about:
• Downloads and Helpful Resources
Keywords
GibbsCAM 2024, virtual points, ALT, ALT+Click, ALT+SHIFT+Click, coordinate interrogation, midpoint, arc center, cubic stock
Was this article helpful?
That’s Great!
Thank you for your feedback
Sorry! We couldn't be helpful
Thank you for your feedback
Feedback sent
We appreciate your effort and will try to fix the article