Summary
GibbsCAM 2026 adds a Measure command that reports both the minimum and maximum distance between two elements or element groups. Results appear in the Measure dialog and as color-coded textboxes in the workspace.
Table of Contents
- What Changed in GibbsCAM 2026
- Before You Begin
- Procedure
- Related Video
- Best Practices
- Troubleshooting
- Related Articles
What Changed in GibbsCAM 2026
Important: The result is based on every element assigned to each group. Confirm the listed element IDs and markers before using the values.
Before You Begin
• Use GibbsCAM 2026 and open the part to inspect.
• Show the geometry and bodies that contain the elements to compare.
• Identify the intended element or element group for Group A and Group B.
• Save the part before beginning the review.
Procedure
Step 1 - Open Measure
1. Open View > Visibility and select Measure.
2. Position the Measure dialog where it does not cover the elements being inspected.
Step 2 - Define the Two Groups
1. Drag marker A onto the first element and marker B onto the second element; reposition either marker as needed.
2. To use selected elements, select the required element or group and choose Use Selection for Group A or Group B.
3. Confirm the element IDs listed under both groups.
Step 3 - Review and Position the Results
1. Read the Minimum and Maximum values in the dialog.
2. Review the yellow minimum and pink maximum textboxes in the workspace.
3. Move a textbox to a clear location and select its pin button to lock that display position.
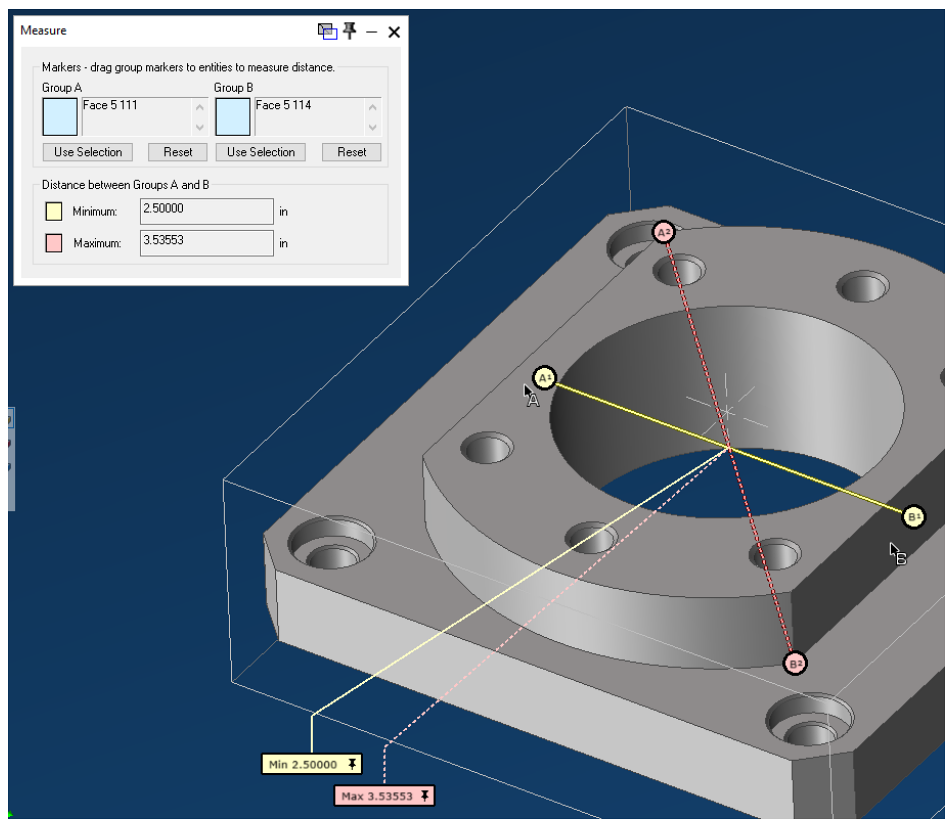
Figure 1 Measure displays both values in the dialog and workspace
Source: What's New in GibbsCAM 2026, p. 16
Step 4 - Reset the Measurement
1. Choose Reset under one group to remove only that group's elements.
2. To clear both groups, right-click in the Measure dialog and choose Reset.
Expected Result
• Group A and Group B list the intended geometry, faces, or edges.
• The dialog displays minimum and maximum distances between the two groups.
• The workspace shows movable yellow and pink result textboxes.
Related Video
Best Practices
• Keep each group limited to the elements needed for the current question.
• Use the element IDs and workspace markers to verify both groups.
• Pin result textboxes only after moving them away from important part detail.
• Reset both groups before starting an unrelated comparison.
Troubleshooting
• Problem: Measure does not report the expected distance.
Cause
• Group A or Group B contains the wrong element.
• A marker was dropped on a different face, edge, or geometry item than intended.
Resolution
Reset the affected group, define it again, and verify its marker and listed element IDs before reading the result.
• Problem: Use Selection replaces elements that were already in a group.
Cause
• Use Selection replaces the current group contents.
• The complete intended selection was not active when the button was chosen.
Resolution
Select every required element for that group, then choose Use Selection again and confirm the listed IDs.
• Problem: A result textbox obscures part detail.
Cause
• The textbox remains at its automatic location.
• The display position was not pinned after the textbox was moved.
Resolution
Move the textbox to a clear area and select its pin button to lock the display position.
• Problem: Old elements remain in the next comparison.
Cause
• Only one group was reset.
• A new selection was assigned to one group while the other group was retained.
Resolution
Right-click in the Measure dialog and choose Reset to clear both groups, then define the new comparison.
Related Articles
Explore More from CAMCO
Visit the CAMCO website to learn more about:
• Downloads and Helpful Resources
Keywords
GibbsCAM 2026, Measure, minimum distance, maximum distance, Group A, Group B, Use Selection, geometry measurement, solid face, body edge, facet body
Was this article helpful?
That’s Great!
Thank you for your feedback
Sorry! We couldn't be helpful
Thank you for your feedback
Feedback sent
We appreciate your effort and will try to fix the article