Summary
GibbsCAM 2024 expands Rotary Finishing Slices pattern choices with Optimized stepover for walls and Cylindrical or conical surfaces. The new patterns help match slice spacing and coverage to wall shapes and revolved geometry.
Table of Contents
- What Changed in GibbsCAM 2024
- Before You Begin
- Procedure
- Related Video
- Best Practices
- Troubleshooting
- Related Articles
What Changed in GibbsCAM 2024
Important: Pattern choice changes path spacing, pass count, trimming, and coverage. Verify the complete path and simulated finish before release.
Before You Begin
• Use GibbsCAM 2024 with the required Rotary or 5-Axis machining option and approved machine definition and post.
• Confirm the rotary axis, part orientation, machining surfaces, stock, and containment.
• Select the production tool and complete holder assembly.
• Record the required surface finish and save a baseline finishing path.
Procedure
Step 1 - Select Rotary Finishing
1. Create or edit the operation and set Calculation based on to Rotary machining.
2. Set Machining to Finishing.
3. Confirm the rotary axis, tool, surfaces, stock, and containment.
Step 2 - Choose the Slice Pattern
1. Open Surface paths and review Slices pattern.
2. Choose Optimized stepover for walls for wall-oriented finishing, or Cylindrical or conical surfaces for matching revolved forms.
3. Use the pattern that matches the selected geometry rather than changing multiple controls at once.
Step 3 - Set Spacing Controls
1. For Optimized stepover for walls, enter the approved maximum stepover and Minimum depth step.
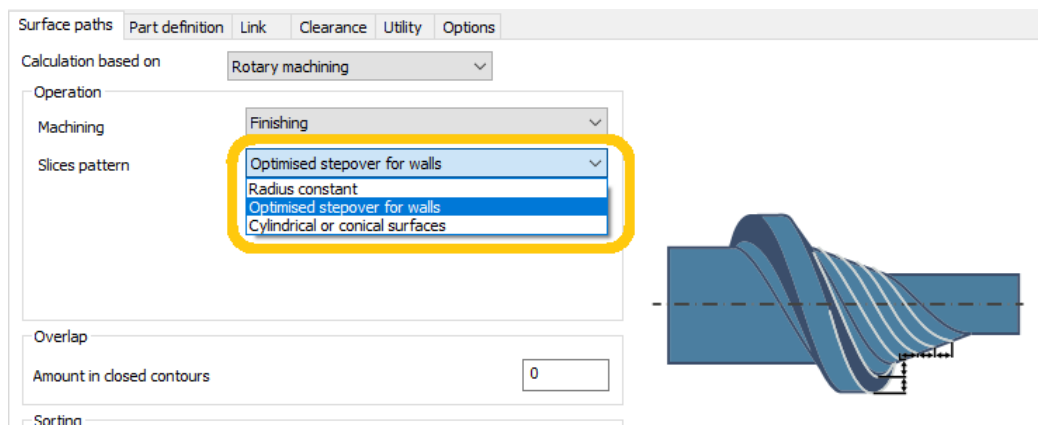
Figure 1 Rotary Finishing adds two Slices pattern choices
Source: What's New in GibbsCAM 2024, p. 32
2. Review any remaining pattern, trimming, overlap, and sorting controls required by the operation.
3. Recalculate and compare pass count and spacing with the baseline.
Step 4 - Validate Coverage and Finish
1. Inspect slice spacing, trimming, coverage, links, rotary direction, and remaining material.
2. Run Op Simulation and Machine Simulation with the complete tool and holder assembly.
3. Confirm the expected finish and review posted rotary motion before a controlled prove-out.
Expected Result
• The selected Rotary Finishing pattern matches the intended wall or cylindrical and conical geometry.
• Slice spacing and pass count follow the approved stepover and depth-step controls.
• Simulation shows complete coverage, acceptable finish, and reachable rotary motion.
Related Video

Best Practices
• Test one slice pattern at a time with the same geometry, tool, and containment.
• Use surface-finish requirements to set stepover instead of minimizing pass count alone.
• Inspect steep transitions, ends, and trimmed boundaries for uneven spacing or missed material.
• Revalidate after changing the pattern, stepover, depth step, stock, surfaces, or rotary setup.
Troubleshooting
• Problem: The new Slices pattern choices are unavailable.
Cause
• The operation is not using Rotary machining with Machining set to Finishing.
• The GibbsCAM version or licensed option does not support the patterns.
Resolution
Confirm GibbsCAM 2024 and the required license, then select Rotary machining and Finishing before reopening Surface paths.
• Problem: Slice spacing is uneven on the walls.
Cause
• The selected pattern does not match the geometry.
• Stepover, depth step, or trimming controls are unsuitable.
Resolution
Use Optimized stepover for walls, verify the maximum stepover and Minimum depth step, then regenerate and inspect the steep transitions.
• Problem: The operation creates too many passes.
Cause
• The maximum stepover or Minimum depth step is smaller than required.
• The selected surfaces or stock extend beyond the intended finishing region.
Resolution
Confirm the finish requirement and machining region, then adjust only the approved spacing control and compare the recalculated pass count.
• Problem: Coverage or trimming does not match the cylindrical or conical form.
Cause
• The geometry is not a suitable cylindrical or conical form.
• The rotary axis, surfaces, containment, or trimming selections are incorrect.
Resolution
Verify the form and rotary setup, correct the selected geometry and limits, and compare with another supported pattern if the part is not truly cylindrical or conical.
Related Articles
• Recommended Simulation Settings
• How to Create a Pack and Go File
Explore More from CAMCO
Visit the CAMCO website to learn more about:
• Downloads and Helpful Resources
Keywords
GibbsCAM 2024, Rotary Finishing, Slices pattern, Optimized stepover for walls, Cylindrical surfaces, conical surfaces, Minimum depth step
Was this article helpful?
That’s Great!
Thank you for your feedback
Sorry! We couldn't be helpful
Thank you for your feedback
Feedback sent
We appreciate your effort and will try to fix the article